
Solrインストールの手順をご紹介します。GMOクラウドALTUSの中でもいちばん安価なBasicシリーズのCentOS 6.4 64bit 上にインストールしました。ちなみに、ALTUS BasicシリーズはVM(仮想サーバ)の構築もウィザードに従ってテンプレートを選択するだけ、ほんの数分で完了します。今回は、「CentOS 6.4 LAMP x64 20141222」というテンプレートを選択し、「solr-test」というサーバ名で構築しました。
- まずは準備しよう
Ⅰ-ⅰ.作業ディレクトリ作成
Ⅰ-ⅱ.JAVAのインストール
Ⅰ-ⅲ.lsofのインストール - いよいよSolrインストール
Ⅱ-ⅰ.Solrのダウンロード
Ⅱ-ⅱ.ダウンロードしたファイルの展開
Ⅱ-ⅲ.ディレクトリ移動 - Solrを使ってみよう
Ⅲ-ⅰ.起動
Ⅲ-ⅱ.コントロールパネル
Ⅲ-ⅲ.サービスとして登録
Ⅲ-ⅳ.サービス確認
Ⅲ-ⅴ.サービス停止と起動
Ⅲ-ⅵ.サービス起動 - コラム・・・Solrコマンドヘルプ一覧
- 連載「売り上げ向上の即効薬『電光石火のウェブサイト』」のほかの記事はこちら
第1回:イントロダクション - 第2回:Solrパワーの活用
- 第3回:Cacheを知ろう
- 第4回:ダイナミックページアッセンブリーの威力がすごい
- 第5回:この記事
Ⅰ.まずは準備しよう
Solrをインストールするための準備を行います。
はじめに作業ディレクトリを作成します。任意の名前で構いません。今回は「src」という名前にしました。
[root@solr-test ~]# mkdir src
[root@solr-test ~]# cd src
次にjavaのインストールを行います。どのようなパッケージが入っているか確認します。
1)パッケージの確認
java-1.6.0-openjdk.x86_64 1:1.6.0.38-1.13.10.0.el6_7 updates
java-1.6.0-openjdk-demo.x86_64 1:1.6.0.38-1.13.10.0.el6_7 updates
java-1.6.0-openjdk-devel.x86_64 1:1.6.0.38-1.13.10.0.el6_7 updates
java-1.6.0-openjdk-javadoc.x86_64 1:1.6.0.38-1.13.10.0.el6_7 updates
~~~中略~~~
java-1.8.0-openjdk-src.x86_64 1:1.8.0.71-1.b15.el6_7 updates
java-1.8.0-openjdk-src-debug.x86_64 1:1.8.0.71-1.b15.el6_7 updates
ldapjdk.x86_64 4.18-6.el6 base
ldapjdk-javadoc.x86_64 4.18-6.el6 base
2)インストール
「java-1.8.0-openjdk-devel.x86_64」というバージョンのjavaをインストールします。
Loaded plugins: fastestmirror
Loading mirror speeds from cached hostfile
* base: ftp.yz.yamagata-u.ac.jp
* extras: ftp.yz.yamagata-u.ac.jp
* updates: ftp.yz.yamagata-u.ac.jp
Setting up Install Process
Resolving Dependencies
--> Running transaction check
---> Package java-1.8.0-openjdk-devel.x86_64 1:1.8.0.71-1.b15.el6_7 will be installed
--> Processing Dependency: java-1.8.0-openjdk = 1:1.8.0.71-1.b15.el6_7 for package: 1:java-1.8.0-openjdk-devel-1.8.0.71-1.b15.el6_7.x86_64
--> Processing Dependency: libawt_xawt.so(SUNWprivate_1.1)(64bit) for package: 1:java-1.8.0-openjdk-devel-1.8.0.71-1.b15.el6_7.x86_64
~~~中略~~~
---> Package libXfont.x86_64 0:1.4.5-5.el6_7 will be installed
---> Package libfontenc.x86_64 0:1.0.5-2.el6 will be installed
---> Package pkgconfig.x86_64 1:0.23-9.1.el6 will be installed
--> Finished Dependency Resolution
Dependencies Resolved
=======================================================================================================================================
Package Arch Version Repository Size
=======================================================================================================================================
Installing:
java-1.8.0-openjdk-devel x86_64 1:1.8.0.71-1.b15.el6_7 updates 10 M
Installing for dependencies:
alsa-lib x86_64 1.0.22-3.el6 base 370 k
fontconfig x86_64 2.8.0-5.el6 base 186 k
~~~中略~~~
tzdata-java noarch 2016a-2.el6 updates 177 k
xorg-x11-font-utils x86_64 1:7.2-11.el6 base 75 k
xorg-x11-fonts-Type1 noarch 7.2-11.el6 base 520 k
Transaction Summary
=======================================================================================================================================
Install 27 Package(s)
Total download size: 45 M
Installed size: 152 M
Is this ok [y/N]:が表示されたらyを入力して進みます。
Is this ok [y/N]: y
Downloading Packages:
(1/27): alsa-lib-1.0.22-3.el6.x86_64.rpm | 370 kB 00:00
(2/27): fontconfig-2.8.0-5.el6.x86_64.rpm | 186 kB 00:00
(3/27): freetype-2.3.11-15.el6_6.1.x86_64.rpm | 361 kB 00:00
(4/27): giflib-4.1.6-3.1.el6.x86_64.rpm | 37 kB 00:00
~~~中略~~~
(24/27): ttmkfdir-3.0.9-32.1.el6.x86_64.rpm | 43 kB 00:00
(25/27): tzdata-java-2016a-2.el6.noarch.rpm | 177 kB 00:00
(26/27): xorg-x11-font-utils-7.2-11.el6.x86_64.rpm | 75 kB 00:00
(27/27): xorg-x11-fonts-Type1-7.2-11.el6.noarch.rpm | 520 kB 00:00
---------------------------------------------------------------------------------------------------------------------------------------
Total 2.3 MB/s | 45 MB 00:20
Running rpm_check_debug
Running Transaction Test
Transaction Test Succeeded
Running Transaction
Installing : freetype-2.3.11-15.el6_6.1.x86_64 1/27
Installing : fontconfig-2.8.0-5.el6.x86_64 2/27
~~~中略~~~
libxcb.x86_64 0:1.9.1-3.el6 pkgconfig.x86_64 1:0.23-9.1.el6
ttmkfdir.x86_64 0:3.0.9-32.1.el6 tzdata-java.noarch 0:2016a-2.el6
xorg-x11-font-utils.x86_64 1:7.2-11.el6 xorg-x11-fonts-Type1.noarch 0:7.2-11.el6
Complete!
3)確認
完了したら、インストールされたことを確認してみましょう。
openjdk version "1.8.0_71"
OpenJDK Runtime Environment (build 1.8.0_71-b15)
OpenJDK 64-Bit Server VM (build 25.71-b15, mixed mode)
lsofはポートからファイルがオープンしている情報を表示するコマンドで、専用のポートを使用するSolrには必須のコマンドです。インストールしておきます。
Loaded plugins: fastestmirror
Loading mirror speeds from cached hostfile
* base: ftp.yz.yamagata-u.ac.jp
* extras: ftp.yz.yamagata-u.ac.jp
* updates: ftp.yz.yamagata-u.ac.jp
Setting up Install Process
Resolving Dependencies
--> Running transaction check
---> Package lsof.x86_64 0:4.82-5.el6 will be installed
--> Finished Dependency Resolution
Dependencies Resolved
=======================================================================================================================================
Package Arch Version Repository Size
=======================================================================================================================================
Installing:
lsof x86_64 4.82-5.el6 base 324 k
Transaction Summary
=======================================================================================================================================
Install 1 Package(s)
Total download size: 324 k
Installed size: 900 k
Is this ok [y/N]:が表示されたらyを入力して進みます。
Is this ok [y/N]: y
Downloading Packages:
lsof-4.82-5.el6.x86_64.rpm | 324 kB 00:00
Running rpm_check_debug
Running Transaction Test
Transaction Test Succeeded
Running Transaction
Installing : lsof-4.82-5.el6.x86_64 1/1
Verifying : lsof-4.82-5.el6.x86_64 1/1
Installed:
lsof.x86_64 0:4.82-5.el6
Complete!
※lsofのイントールも必要ですが、すでにある場合はインストール作業は必要ありません。
Ⅱ.いよいよSolrインストール
ここまでで準備は完了です。いよいよSolrの最新版をダウンロードします。
--2016-02-28 11:13:26-- http://ftp.tsukuba.wide.ad.jp/software/apache//lucene/solr/5.5.0/solr-5.5.0.tgz
Resolving ftp.tsukuba.wide.ad.jp... 203.178.132.80, 2001:200:0:7c06::9393
Connecting to ftp.tsukuba.wide.ad.jp|203.178.132.80|:80... connected.
HTTP request sent, awaiting response... 200 OK
Length: 136758069 (130M) [application/x-gzip]
Saving to: ?solr-5.5.0.tgz?100%[=============================================================================================>] 136,758,069 7.21M/s in 18s2016-02-28 11:13:44 (7.20 MB/s) - ?solr-5.5.0.tgz?
ダウンロードしたファイルを展開します。
solr-5.5.0/LUCENE_CHANGES.txt
solr-5.5.0/contrib/analysis-extras/lib/
solr-5.5.0/contrib/clustering/lib/
solr-5.5.0/contrib/dataimporthandler-extras/lib/
~~~中略~~~
solr-5.5.0/docs/solr-velocity/resources/tab.gif
solr-5.5.0/docs/solr-velocity/resources/titlebar.gif
solr-5.5.0/docs/solr-velocity/resources/titlebar_end.gif
solr-5.5.0/docs/solr-velocity/stylesheet.css
展開したディレクトリに移動します。
Ⅲ.Solrを使ってみよう
Solrを起動してみましょう。Solr4.x以前をご存じの方は「あれっ?」と思われたのではないでしょうか。Solr5.xはjettyを組み込んでいて、スタンドアロンサーバとして動作するようになりました。
Waiting up to 30 seconds to see Solr running on port 8983 [\]
Started Solr server on port 8983 (pid=2360). Happy searching!
そして、Solrの停止は以下のとおりです。
Sending stop command to Solr running on port 8983 ... waiting 5 seconds to allow Jetty process 2360 to stop gracefully.
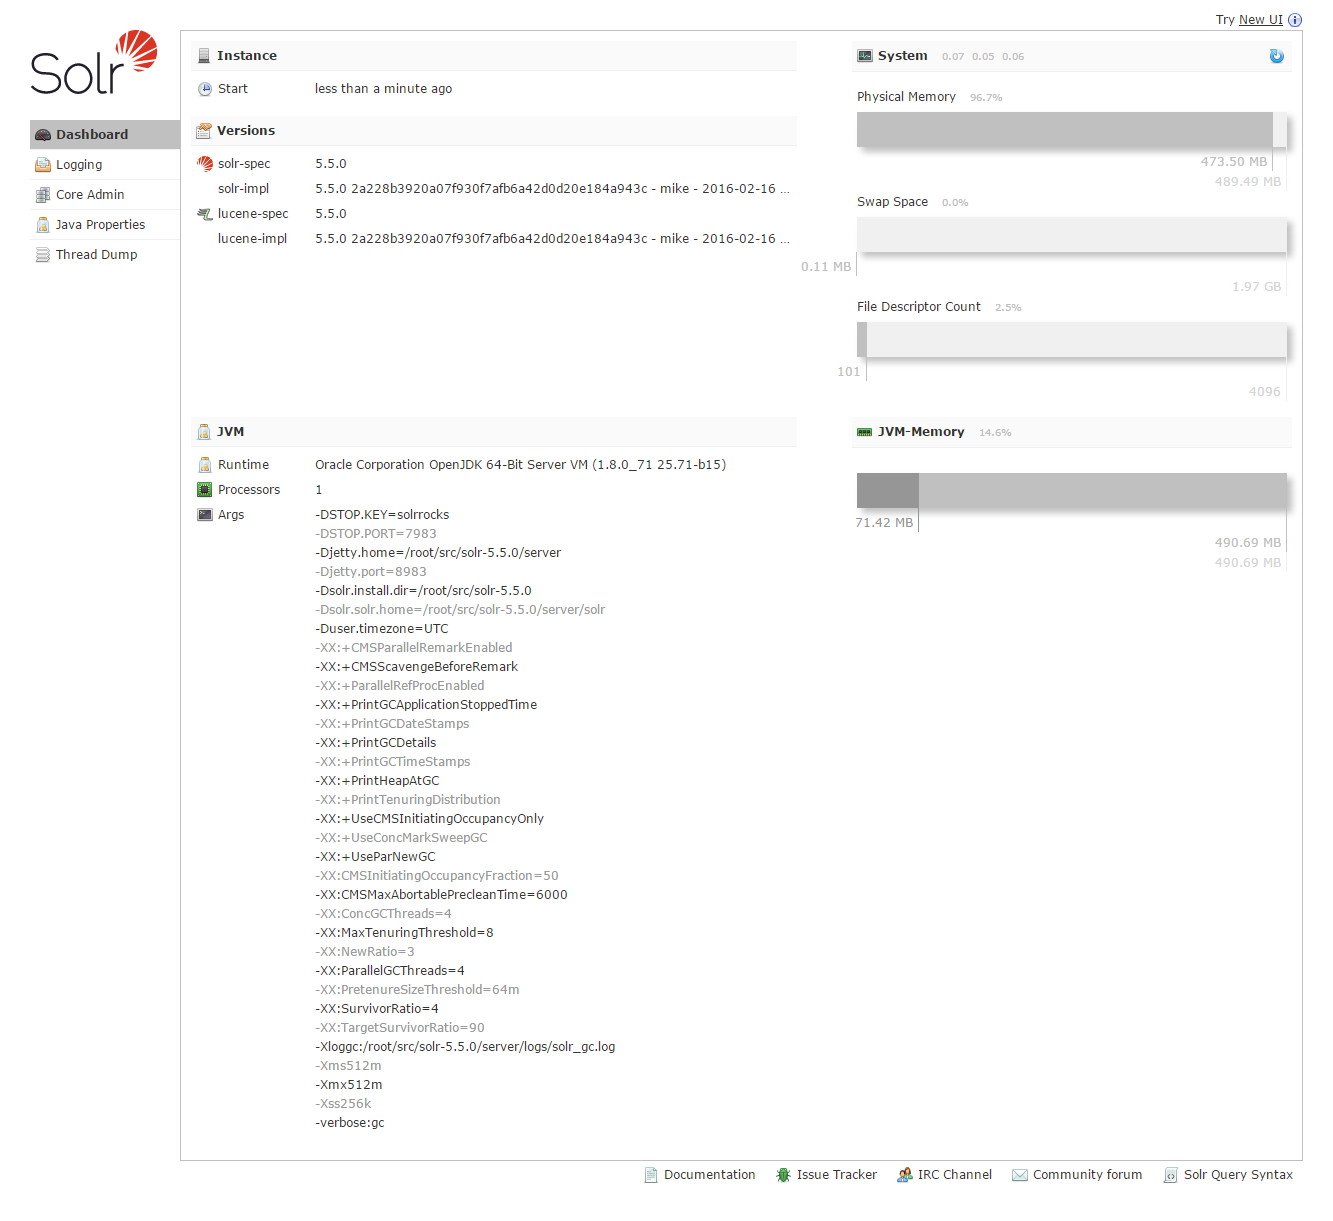
起動後、http:// localhost:8983/ にアクセスするとSolrの管理画面を見ることができます。
サービスとして組み込むのは別途作業が必要です。専用のスクリプトが同梱されているので、さきほどアーカイブをダウンロードしたディレクトリに移動します。
アーカイブからスクリプトを抽出します。
solr-5.5.0/bin/install_solr_service.sh
スクリプトを実行します。スクリプトは(1)solrユーザーを作成し、(2)アーカイブを展開して、(3)Solrサービスをインストールします。
id: solr: No such user
Creating new user: solrExtracting solr-5.5.0.tgz to /optInstalling symlink /opt/solr -> /opt/solr-5.5.0 ...Installing /etc/init.d/solr script ...Installing /etc/default/solr.in.sh ...Port 8983 is already being used by another process (pid: 2797)
Please choose a different port using the -p option.Found 1 Solr nodes:Solr process 2797 running on port 8983
{
"solr_home":"/root/src/solr-5.5.0/server/solr",
"version":"5.5.0 2a228b3920a07f930f7afb6a42d0d20e184a943c - mike - 2016-02-16 15:22:52",
"startTime":"2016-02-28T02:25:34.874Z",
"uptime":"0 days, 0 hours, 4 minutes, 57 seconds",
"memory":"73.1 MB (%14.9) of 490.7 MB"}Service solr installed.
インストールが終わった段階で、サービスは起動していますので、確認してみましょう。
Found 1 Solr nodes:
Solr process 2797 running on port 8983
{
"solr_home":"/root/src/solr-5.5.0/server/solr",
"version":"5.5.0 2a228b3920a07f930f7afb6a42d0d20e184a943c - mike - 2016-02-16 15:22:52",
"startTime":"2016-02-28T02:25:34.874Z",
"uptime":"0 days, 0 hours, 6 minutes, 4 seconds",
"memory":"73.1 MB (%14.9) of 490.7 MB"}
サービスの停止は以下のように。ちなみに、完了後のメッセージにある「stop gracefully」は、直訳すると「優美に終了」ですが、この言葉で表しているのは、潔い引き際を表すことわざ「立つ鳥跡を濁さず」というようなニュアンスです。面白いですね。
Sending stop command to Solr running on port 8983 ... waiting 5 seconds to allow Jetty process 2797 to stop gracefully.
[root@solr-test src]# service solr start
Waiting up to 30 seconds to see Solr running on port 8983 [\]
Started Solr server on port 8983 (pid=3620). Happy searching!
さて、Solrのインストールはいかがでしたか?Solr5.xは確認しながら作業しても、20分もあればインストールできてしまいます。多機能で高速なSolrであなたも「Happy searching!」
Ⅳ.コラム・・・Solrコマンドヘルプ一覧
[root@solr-test solr-5.5.0]# bin/solr start -help
Usage: solr start [-f] [-c] [-h hostname] [-p port] [-d directory] [-z zkHost] [-m memory] [-e example] [-s solr.solr.home] [-a "additional-options"] [-V]
-f Start Solr in foreground; default starts Solr in the background
and sends stdout / stderr to solr-PORT-console.log
-c or -cloud Start Solr in SolrCloud mode; if -z not supplied, an embedded Zookeeper
instance is started on Solr port+1000, such as 9983 if Solr is bound to 8983
-h <host> Specify the hostname for this Solr instance
-p <port> Specify the port to start the Solr HTTP listener on; default is 8983
The specified port (SOLR_PORT) will also be used to determine the stop port
STOP_PORT=($SOLR_PORT-1000) and JMX RMI listen port RMI_PORT=(1$SOLR_PORT).
For instance, if you set -p 8985, then the STOP_PORT=7985 and RMI_PORT=18985
-d <dir> Specify the Solr server directory; defaults to server
-z <zkHost> Zookeeper connection string; only used when running in SolrCloud mode using -c
To launch an embedded Zookeeper instance, don't pass this parameter.
-m <memory> Sets the min (-Xms) and max (-Xmx) heap size for the JVM, such as: -m 4g
results in: -Xms4g -Xmx4g; by default, this script sets the heap size to 512m
-s <dir> Sets the solr.solr.home system property; Solr will create core directories under
this directory. This allows you to run multiple Solr instances on the same host
while reusing the same server directory set using the -d parameter. If set, the
specified directory should contain a solr.xml file, unless solr.xml exists in Zookeeper.
This parameter is ignored when running examples (-e), as the solr.solr.home depends
on which example is run. The default value is server/solr.
-e <example> Name of the example to run; available examples:
cloud: SolrCloud example
techproducts: Comprehensive example illustrating many of Solr's core capabilities
dih: Data Import Handler
schemaless: Schema-less example
-a Additional parameters to pass to the JVM when starting Solr, such as to setup
Java debug options. For example, to enable a Java debugger to attach to the Solr JVM
you could pass: -a "-agentlib:jdwp=transport=dt_socket,server=y,suspend=n,address=18983"
In most cases, you should wrap the additional parameters in double quotes.
-noprompt Don't prompt for input; accept all defaults when running examples that accept user input
-V Verbose messages from this script